
First of all, I would like to thank all visitors who have found my little blog the past year, in total a little over 900 unique visitors from 51 countries. Thanks as well for all reactions! It's always nice to get some feedback and encouragement every now and then.
I'm really looking forward to the new year, which already promises to become another great tramway modeling year with loads of exciting new models announced. As for me, I'll be in Canada for the next few weeks, but after that I hope to make some good use of the long winter evenings to do some fine tramway modelling. I'll keep you informed!
Have a great 2011 everybody!
Wednesday, December 29, 2010
Tuesday, December 7, 2010


Saturday, December 4, 2010
T7B5 from Oslo (2)

Shorty after the arrival of the transport from the Czech Republic, the T7B5 was spotted doing test runs. The opinion of both staff and onlookers: A great gain for the city!
Read more about the model and prototype in a previous post.
Thursday, December 2, 2010
Tomytec Kumamoto 9700
Like the previously released Portram/ Centram the shell fits on the TM-LRT01 powered chassis. Two colours will be available, early livery (white/light blue) and late livery (white/black).
Introduced in 1997, the 9700 series were the first low-floor trams in Japan. I think they have quite a European look, as they were build in Japan under license from German manufacturer Adtranz.
Become a member of the Tomix Yahoo Group to get more news like this first hand!
Monday, November 29, 2010
Lighting up

 These streetlights are very cheap ones from Hong Kong (eBay, 10 for under € 10,-, and free shipping as well!) but I think they look quite okay on the little layout.
 The wiring is nothing fancy, I just connected them to two AA batteries, which are hidden inside the module. A little switch turns them on. I chose to go for battery power because the tiny LED's will probably last almost forever on a battery charge and it keeps connecting modules in the future very simple.
I'm really enjoying this stage of construction in which the city gets more and more alive with every detail added.
And my T7B5 should be arriving shortly! Looking forward to running it. Hope to get some more track in soon as well, so I can start on the turning loops. Then the enjoyment of watching the trams go by can really begin :)
Tuesday, November 23, 2010
How 'bout a little triangular layout?
 Just an idea. I think it'll look quite good with a couple of these in the middle :)
Design made with Tomix 103R and 140R curves/turnouts. Size 50 x 50 cm.
Saturday, November 20, 2010
Tram stop construction

Monday, November 15, 2010
Auhagen 14464

The kit comes with a white/greyish and a light yellow building, but the rather shiny plastic definately needs a coat of paint.
German manufacturers have a good habit of casting the window frames seperately, which always makes the painting process a lot easier. Also nice: all side walls in the kits are moulded together.

I really like this modular approach. This is my first Auhagen kit and I must say I'm pleasantly surprised, looking forward to building it!
A couple examples:


Friday, November 12, 2010
A small turning loop
 Figured out what I believe is about the smallest possible turning loop based on 140 R Tomix Finetrack. I avoided an S-curve in this design, which could mean trouble for several coupled trams. The tram stop can be situated either along the diagonal S99 or along the S280 at the bottom.The baseboard for this loop should be about 50x35 cm.
My plan is to make two modules based on this design to get a basic layout, which can be extended with new in-between modules in the future. Decided to go for these instead of the Y-turns because of the ease of operation.
Thursday, November 11, 2010
Croncrete slabs and rusty masts (2)
As promised in my last post, some more pictures. I have been unable to use any pictures made with my mobile phone, so I took some afterwards. These don't show all stages of building, sorry about that.

The base was made from 2mm dia styrene tube, with a drilled hole in which the 1.2mm dia brass tube fits. The 0.5mm brass wire was soldered to the tube. Some insulation from electric wire finishes the mast. I sprayed the whole mast a light grey colour, and then painted the wire-hanging parts black with a little drybrushed rusty colour. After all, Lileau community isn't spending much on maintenance ;)


This picture also shows the top of the M4 bolts the masts have been attached to. They look a little big, but I've seen examples of these in real life so I'm not that bothered about them.
By the way, the platforms aren't glued down yet, this will be fixed soon.
Sunday, November 7, 2010
Concrete slabs, rusty masts and brand new Combino's

I would like to show some of the process, but I'm having trouble uploading pictures from my mobile phone to blogger, so you'll have to do with this picture of the results for now.
Will upload some pictures of the work in progress when I have figured out the problem.
By the way, really looking forward to the release of Modemo's Combino. Some mouthwatering pictures of the prototype can be found here.
Monday, November 1, 2010

Thursday, October 28, 2010
Ah, some progress!
 It's been one of those good days: a day off from work and plenty of time to do some modeling. A nice day to make some progress on the road and trackwork of the downtown module :)
My initial plan was to use ballasted Tomix Finetrack, but as the new Tomix Wide Tram track was released recently, I decided to go for that. I gave the rails a dark brown coat of paint. The surface will get concrete colour at a later stage.
Next up were the sidewalk and the two platforms for the tram stop.
I also made some good progress on the Artitec building at the right. It's an incredibly fiddly job to paint all those window frames and architectural details, but I'm happy about it so far.
Ah, and I've also been in contact with Hobbytrain/Lemke. They think the new Düwag M6 will be released in about 5 to 6 months. Looking forward to it! :)
Friday, October 15, 2010
Fresh tram news
From N-Gauge Information:
In spring 2011, Tomytec will be releasing a model of the 2000 series tram in Kyoto and Matsushima liveries. If I understand it correctly, a new chassis is being developed for this tram, which will be adjustable in lenght. This would make it great news for modelers, definately worth following!
And then there's also news from Modemo. Plans are to develop a model of a 5000 series Hiroshima 'Green Mover' LRV, a Siemens Combino. The tram will have a flywheel and working head and tail lights. A model which will undoubtedly look good on many European layouts as well.
Good modeltramnews just keeps coming these days :)
Tuesday, October 12, 2010
Ivanovo tram: just another sad story

Last day of Ivanovo tram - cabview
Tracks on closed lines and last two trams in service
Monday, October 11, 2010
Work in Centre-ville


When the track arrives from Japan, I'll probably cut slots in the plywood for it to fit in, in order to get the top of the rails level with the streets. That should give the track a bit more a tram-like appearance.
Sunday, October 3, 2010
Recent developments

Well, I decided that I won't finish it the way it was intented, but instead use the layout as a base for a new layout in G9 scale (1:22,5, running on 9 mm track). Read about these developments in the thread I've started on the Gn15 forum. Now I just have to find a nice prototype to model :)

The story*
As I think every layout needs a story behind it, here's mine:
Alfred Mongy is known for constructing the grand boulevards between the french towns Lille, Roubaix and Tourcoing, giving the towns a connection by tramway. However, little known is that he also did a similar project in Lileau, a town with roughly 50.000 inhabitants on the French/Belgian border. Finished just before the beginning of the 20th century, the boulevard and tramway (althought slightly less wide as in Lille) connect the city center with its suburbs.
Originally, two-axle vehicles drove the line, which were later replaced by 4-axle units. In the 1970's it became clear that much had to be invested in new trams, to replace the aging stock. However, the city counsel made plans not to do so and replace the trams by cheaper city buses. An end had come to 80 years of tramway history in Lileau...
...if it wasn't for the Lileau people. They were outraged and absolutely weren't going to lose their beloved tram. By the smallest possible majority the plans were rejected and the tramway was saved, be it that not much money was invested in maintenance and rolling stock. The community transport authority had to purchase trams second hand from many European and even a few US cities, making Lileau a favorite city for tram enthousiasts. Düwags, Tatra's and even PCC cars can be seen operating on a single network.
Things have been looking good for the tramway recently. Although mostly second hand stock is used, rumours have it that the transport autority will be investing in brand new light rail vehicles. A tram from Toyama has even been spotted during test runs...
*This story is completely fictional and not by any means final. It may be changed without prior notice ;)
Thursday, September 30, 2010
Some (new) products
A couple of N scale tram-related products I recently learned about:
 New from GHB International is this model of a Birney Streetcar, in the double truck variety. Prices of this nice model start at $ 39,- for an unpainted shell and $ 59,- for a motorized model, add $ 16,- for a working trolley pole. A painted model will cost $ 20,- extra per colour. But for that, you can get the model in any livery you like. I'm shure this model will find its way to many US trolley layouts!
 Finescale und mehr does these brass N gauge tram rails, both in a NEM (=N standard) and finescale variety. A package costs € 23,-, which is enough to make a meter of track. Not a bad price! Note: the cobble stones have to be ordered separately.
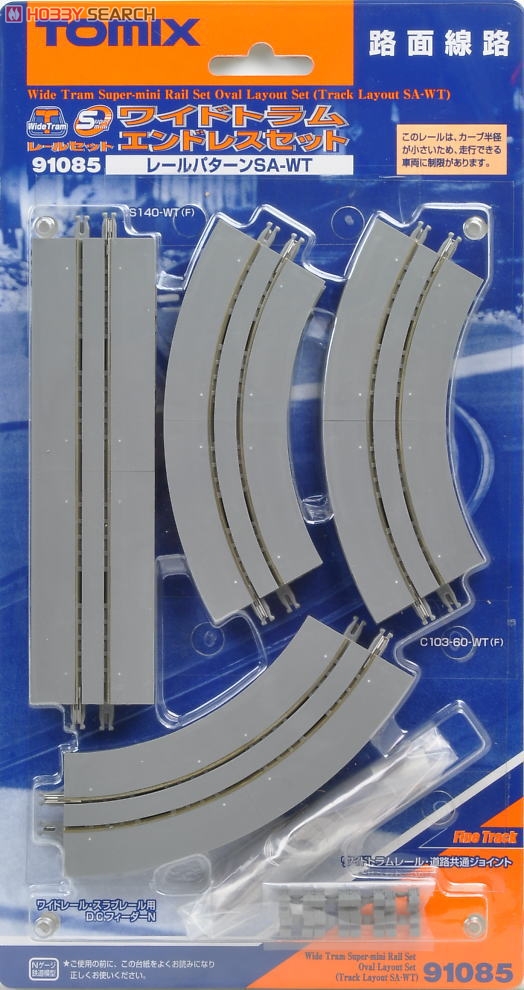 Speaking of tram track, Tomix Wide Tram Track is slowly becoming available in online stores. Hobby Search lists the following items at the moment:
0113 - Rail Joiners
1790 - 140mm straight 2x
1790 - 70mm straight 2x
1796 - R140 curves, 2x 30 degrees, 2x 60 degrees
1797 - R177 curves, 2x 30 degrees, 2x 60 degrees
91085 Mini rail basic set
91086 Super Mini oval set


0113 - Rail Joiners
1790 - 140mm straight 2x
1790 - 70mm straight 2x
1796 - R140 curves, 2x 30 degrees, 2x 60 degrees
1797 - R177 curves, 2x 30 degrees, 2x 60 degrees
91085 Mini rail basic set
91086 Super Mini oval set
Sunday, September 19, 2010
Turning trams: the triangle
The easiest way to turn uni-directional trams on a layout, of course, would be the turning/balloon loop. Just the polarity of the track would be a factor to consider. And if the tram line happens to be double track, even that wouldn't be a problem. The only drawback is that balloon loops are quite space consuming, epecially when not the smallest curve radii are used.
I have been looking for alternatives for the balloon, which there aren't a lot, but found the turning triangle quite useful, and also very easy to construct using the Tomix line of track:

The left design is basically a main line with a facility to reverse into and head back the other way. Several tram systems use these for backup turning options in case of a blockage further down the line. Note the use of an S99 piece at the end, which limits the length of trams. Of course any longer straight piece of track could be used here. (making the triangle considerably less compact though...)
The other option is the use of a turning triangle at the end of a (single track) line. See this video for a tram that uses exactly such a turning facility. By the way, I love the traffic lady and her little shelter in the video :)
 This drawing shows a possible double-track solution. Left a balloon loop, using Tomix components (140mm radius minimum).
A turning triangle does require some action from the operator, but makes a great scene for spectators!

A turning triangle does require some action from the operator, but makes a great scene for spectators!
Friday, September 17, 2010
Going modular

To see how things looked, I made this plywood base for a 15x35 cm micro module (which, conveniently, is the lenght of five 70mm Tomix straight track pieces).
And I must say I'm starting to like the idea!
Sunday, September 12, 2010
T7B5 from Oslo: A unique prototype
On the Japanese Modelling & Japan Rail Enthousiasts Forum I read about Michal from the Czech Republic who has build an impressive collection of mainly Eastern-European and German trams in N scale. I think he has done a great job on his models, like various ČKD Tatra types as the T6A5 the KT4, the Polish Konstal 105N and the German KSW tram (which is also produced by Kato), all etched in 0.3 mm brass. He even sells most of them, both as a kit or build (some even motorized) on his website. Interesting for US modellers: Michal also does a Škoda 10 T, which runs in Portland, Oregon and Tacoma, Washington.
If you click on kolejiště, you see some pictures of Michals very cleverly designed tram layout.
 My eyes fell on this little tram. It's a ČKD Tatra type T7B5, a uni-directional tram. The livery is quite unusual because it's that of Oslo Sporveier, the Norwegian capital's public transport authority. Only one was ever purchased for Oslo, which was actually the only Tatra ever to run in Scandinavia, or even the whole of Western Europe!
I like both Eastern-European and Scandinavian prototypes so I just had to place an order for one of these, which will be powered using a Tomix TM 03 chassis. Can't wait for it to arrive! :)
 The Tatra T7B5 was never a successfull series. Only a handfull were build at the end of the 80's, mainly for Moscow. Oslo Sporveier, at that time, was looking for a replacement for its old Høka cars. One of the original two prototypes was shipped to Oslo for testing, after it got a new interior and paint job.
The order finally went to Ansaldo/Firema, who build 32 articulated low-floor trams, the SL95 series.
The T7B5 was used for a couple of years, after which it was converted into a party tram. The tram was shipped to the Swedish city of Göteborg in 1998, where it kept being a party tram in its blue Olso livery. It's believed to be still there, although not in service any more.
If you click on kolejiště, you see some pictures of Michals very cleverly designed tram layout.

I like both Eastern-European and Scandinavian prototypes so I just had to place an order for one of these, which will be powered using a Tomix TM 03 chassis. Can't wait for it to arrive! :)

The order finally went to Ansaldo/Firema, who build 32 articulated low-floor trams, the SL95 series.
The T7B5 was used for a couple of years, after which it was converted into a party tram. The tram was shipped to the Swedish city of Göteborg in 1998, where it kept being a party tram in its blue Olso livery. It's believed to be still there, although not in service any more.
Sunday, September 5, 2010
Collecting for my new layout...

Guess that solves the dilemma whether my new layout will be European or Japanese ;)
A couple of pictures of the resin castings (I just started on the department store):


Monday, August 30, 2010
A new idea

Overhead: the easy way

The big advantage of not having to pull all overhead wires is that it's done in no-time, while the layout still has the looks of a suburban tram terminus.

I know the placement of the masts is not entirely prototypical, a lot more of them would be needed to keep the wire over the track. On the other side, putting them closer together would also unprototypical...
I hope I found an acceptable compromise here.
Friday, August 27, 2010
Tight radius stress (2)
Okay, I'll finish the layout I'm currently working on as soon as possible, and then start to work on a new one. One on which all of my models will actually run. There are just too many that don't make it through the tight 103mm curves. Anyone interested in a 30x40 cm microlayout? :)
Bybanen (2)
When travelling through Norway for the past few weeks, I had a chance to visit Bergens recently opened Bybanen, a lightrail line linking the city center with its southern suburbs. The line's current terminus is Nesttun, but extensions as far as Flesland airport have been planned. Ticket selling is completely done on the stations, which means stopping time can be kept to a minimum, making the Bybanen an extremely efficient way to travel. The frequency is about every ten minutes, even on sundays.
Clearly a lot of thought has been given to every detail. The 12 Variotrams from Stadler Rail have nice little features like artwork on the ceilings, for every station's announcement a different specially composed tune and matching stylized contour lines, both on the seats and engraved in the glass shelters. A spectacular return of the tram in Bergen!
There's an extensive Wikipedia article about the Bybanen.
 |
| 203 at Nesttun terminus. Note the temporary platform. |
 | ||
| Matching lines on seats and shelters |
Clearly a lot of thought has been given to every detail. The 12 Variotrams from Stadler Rail have nice little features like artwork on the ceilings, for every station's announcement a different specially composed tune and matching stylized contour lines, both on the seats and engraved in the glass shelters. A spectacular return of the tram in Bergen!
There's an extensive Wikipedia article about the Bybanen.
German tram from France

Click here for a nice video of these trams in action.
The two now still existing tramway lines in Lille were opened 1909. The line starts in the city center, and then branches off to Tourcoing, while the main line continues to Roubaix. The system was named after its engineer, Alfred Mongy. Mongy was quite ahead of his time, as the double-track lines were placed in the center of the boulevards, not having to share their right-of-way with other traffic. Probably the reason why these lines are still there nowadays, fuctioning side-to-side with Lille's VAL, and have not been closed down like in so many other French cities. Read more about the Mongy's history.
Sunday, August 1, 2010
Tight radius stress
After a recent discussion on the Yahoo N scale traction group about minimum radius curves for N scale trams, I thought it would be a good idea to make a list of trams which make it through a 103mm radius (the tightest commercially available) and which ones won't. Test location was my little layout-to-be. It turns out that all trams make it through really, but the Bachmann PCC and Arnold Düwag are quite noisy, which indicates stress on the gears. Definately not healthy in the long run. And especially the Arnold is a little too expensive to ruin this way...
No problems with 103mm radius:
Kato 'pocket line' tram chassis
Kato 'shorty' 4 axle chassis
Tomytec LRV chassis (Portram, Centram etc.)
Bachmann Brill trolley
Noisy on 103 mm radius:
Bachmann PCC
Arnold Düwag (and a little smelly as well...)
This really makes me think about using 140mm as a minimum for future layouts.
Monday, July 26, 2010
And another new model!

Thursday, July 22, 2010
Roofing

Looks a lot more European to me!
A pretty picture

Layout update

Still no sign of the other two DPM buildings :(

In case you're wondering, Momo's missing pantograph has been recovered in the meanwhile :)
Friday, July 16, 2010
A new tram from Bachmann?
Rumour has it that Bachmann will release a completely new model in N scale, the Peter Witt streetcar. Apparently, the model comes DCC equipped, at a price of about $ 140,-. I'm not that familiar with American traction, but I definately like the looks of this tram! See a picture of the model here.

Join the N scale traction group to discuss this subject!

Join the N scale traction group to discuss this subject!
A little on streets and buildings
I've decided to build the middle of my layout as a seperate unit, which will be glued in place when finished. This should make the build a little easier.
 Like you can see in the little drawing I made, there will be a dead-end street with a couple of houses in the middle. I made the street from 1 mm styrene sheet, using a tiled sheet from Evergreen for the pavement. The tiles are 2.1 mm square, about 30 cm in the 1:1 world. A 1x1 mm strip was glued to the edge of the pavement. Still a lot of detailing and painting to do but it starts to look believable :)
The building is DPM's Otto's Parts. I didn't really change anything to it. Perhaps it'll get a tiled roof, but I'll make a mockup first to see how that looks. A couple more DPM buildings should be on their way from the States right now. Can't wait to start on those.
 This little building is made by Artitec. It's a little transformer kiosk ('electriciteitshuisje'), of a design very common in the Netherlands. I thought it would make a nice addition to the layout. It came as a highly detailed resin kit, which was surprisingly easy to build and paint, despite its absolutely tiny size (see the paint container in the back as a comparison...) Now just find a nice place for it :)

The building is DPM's Otto's Parts. I didn't really change anything to it. Perhaps it'll get a tiled roof, but I'll make a mockup first to see how that looks. A couple more DPM buildings should be on their way from the States right now. Can't wait to start on those.

Subscribe to:
Posts (Atom)